
Philly cheesesteak secrets start with one goal: build a sandwich where thin beef, melted cheese, and crisp roll act like one hot system. When you control heat, slice thickness, and melt timing, the flavor feels effortless. Still, the results prove it’s engineered, not guessed.
- Choose the Right Cut for Philly Cheesesteak Results
- Build Flavor with Proper Onion and Pepper Cooking
- Prep Like a Pro: Mise en Place for Philly Cheesesteak
- Cook the Steak the Right Way on a Hot Griddle
- Melt Cheese for Stretch and Creaminess
- Assemble for Maximum Bite Quality
- Philly Cheesesteak Secrets: Full Recipe Workflow
- Prep and Cook Time
- Yield
- Difficulty Level
- Ingredients
- Instructions
- Tips for Success (and Common Mistakes to Avoid)
- Serving Suggestions That Match the Philly Cheesesteak
- FAQ
At a Glance
- Use ribeye and slice it very thin for fast, juicy cook.
- Sauté onions and peppers first, then combine at the end for better browning.
- Toast rolls lightly so they resist steak juices without drying out.
- Melt cheese at the end under cover so it stays gooey, not oily.
Let’s focus on what makes a great cheesesteak taste “right.” It isn’t only the ingredients. The sequence and timing create signature texture: tender steak, stretchy cheese, and bread that holds up.
In Philadelphia, cheesesteaks earned their reputation through consistency. Hot griddle contact, quick cooking, and melted cheese that clings to meat matter most. You can match that performance at home with a simple workflow and a few precise choices.
Choose the Right Cut for Philly Cheesesteak Results
Your beef needs marbling and tenderness so it stays juicy when it cooks fast. Ribeye fits that job well because fat distribution supports browning while keeping the bite soft.
Slice the steak thin against the grain. Grain direction changes how muscle fibers shorten, which directly affects chew. If you cut correctly, each strip cooks quickly and tastes less chewy.
For a clear reference on how cuts behave, review meat cutting. This helps you understand why “thin” isn’t just preference. It controls texture.
Also, keep the meat workable before slicing. Many cooks chill the ribeye briefly because firmer surface layers help you maintain uniform thin slices. Uniform strips cook evenly and reduce overcooked edges.
When you portion, plan for speed. A cheesesteak relies on a short high-heat window, so you want ready-to-cook strips at the griddle. That preparation reduces downtime and helps the sear stay clean.
Thickness control also protects your melt. When beef cooks evenly, the cheese heats at the same pace as the topping layer. That keeps the sandwich cohesive.
Build Flavor with Proper Onion and Pepper Cooking
Onions deliver sweetness and moisture. However, if you rush them, you risk uneven browning and sharper flavors. Cook them steadily until they turn golden and soft.
When onions caramelize, their sugars develop rounded, savory sweetness. That process links to classic browning chemistry. For background, read Maillard reaction and how heat creates flavor compounds.
Add bell peppers for a classic balance. Keep slices thin so they finish in the same heat window as the onions. If you want a “Philly feel,” aim for tender peppers, not raw snap.
To protect texture, sauté vegetables and then remove them from the pan. Later, you combine them with steak for a brief final heat cycle. This approach prevents overcooking and helps the beef sear stay the hero.
Seasoning Without Overpowering the Meat
Use salt and black pepper with restraint. Start with salt for onion moisture control and savory depth. Then add pepper closer to cooking so aroma stays bright.
Also remember that cheese adds salt. If you salt steak heavily at the start, the finished sandwich can taste sharp instead of balanced. Balance matters because Philly cheesesteak flavor works best when every element supports the others.
Prep Like a Pro: Mise en Place for Philly Cheesesteak
Good cheesesteak cooking moves fast. You prevent dry steak and uneven melts by gathering everything first. Before heat goes on, set up your station and portion your ingredients.
Stage rolls, cheese slices, steak strips, and cooked vegetables so assembly takes minutes. That speed matters because cheesesteaks taste best hot and fresh. Waiting cools the melt and changes bite quality.
For roll behavior and structure, review bread. Toasting affects how starch and moisture respond when heat and steam hit the crumb.
Choose a practical workflow for your kitchen. If you can’t slice and cook simultaneously, prep earlier and keep vegetables covered. Plan so you never scramble mid-cook.
Toast Rolls for Structure, Not Crunch
Toast rolls lightly. You want a sturdy outer layer and a soft interior. If you toast too hard, the sandwich feels dry and the cheese pulls away.
Toast after you cook vegetables but before you melt cheese. That timing helps you build while everything stays hot. It also reduces total time the cheese spends exposed on the griddle.
This caution protects mouthfeel. Proper melt should look glossy and cohesive. Overheating makes it oily and reduces stretch.
Cook the Steak the Right Way on a Hot Griddle
The griddle must run hot. A Philly cheesesteak cooks in a short window, so you need strong surface contact for browning without long exposure. Hot contact gives you sear, not gray meat.
Spread beef in a thin layer. Don’t pile strips on top of each other. Stacking forces steaming, which keeps meat pale and can make texture feel rubbery.
Cook quickly, then fold and toss. Keep pieces moving enough to prevent scorching spots. At the same time, let the surface contact build enough browning.
For the mechanics of skillet cooking, read frying. This helps you understand why heat transfer and moisture drive browning speed on a flat top.
When to Combine Steak and Vegetables
Combine steak and onions at the end, not at the beginning. When you add vegetables early, they release moisture and cool the pan. That reduces browning and delays steak sear.
After steak finishes, toss in onions and peppers for a short reheating cycle. You want them hot and integrated, not cooked into mush. This step keeps the sandwich bright and structured.
Melt Cheese for Stretch and Creaminess
Cheese determines the sensory “pull.” It should melt fast and coat steak strips evenly. Provolone and American-style cheeses melt well when heated briefly and covered.
Cheese melt behavior depends on fat and protein structure. For general background, review cheese and how heating changes texture. Your goal stays simple: quick melt and clean flow.
Layer cheese directly on the hot beef-vegetable mixture. Cover with a lid or foil for about a minute so heat penetrates and the cheese flows. Then remove it from heat right away.
If you melt too long, fat separation can happen. If you melt too short, cheese may not bind properly. Timing is the difference between “stretchy” and “splotchy.”
Classic Choices and When to Use Each
If you want classic Philly flavor, choose provolone for a clean, creamy melt. If you prefer a brighter, gooier profile, choose melting American-style cheese. Both can work, but they behave differently under heat.
Keep portions generous but avoid overloading. Too much cheese can cause greasy separation and bread sogginess. Instead, aim for even coverage over the hot meat.
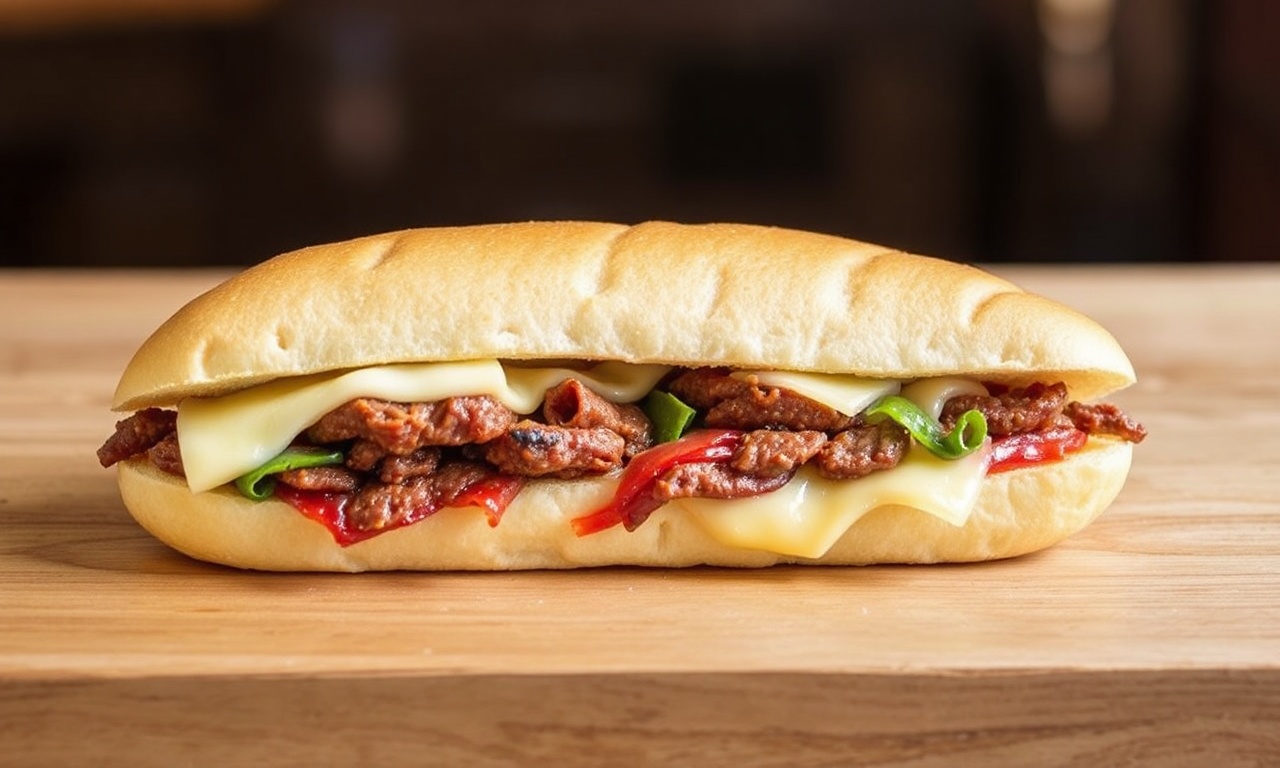
Assemble for Maximum Bite Quality
Assembly should follow one smooth rhythm: open rolls, pile meat first, melt cheese on top, then close and serve. Each step affects how long the cheese stays glossy.
Place the hot steak-cheese mixture into rolls while it still steams. Steam warms the bread interior and helps the cheese bond to the meat. That bond keeps bites cohesive instead of falling apart.
If you serve sides, pick ones that match heat and salt levels. A salty, crisp side offsets the rich meat and melted cheese. For broader context on snack foods, see snack food.
Serve Immediately for the Best Texture
Letting cheesesteaks sit cools the cheese and firms the fat. That change reduces stretch and makes bread harder to bite. Hot sandwiches hit the palate differently because the melt stays fluid.
Plan your timing: cook steak and cheese, then assemble, then plate. Aim to leave the pan within minutes of melting. If you hold at all, cover loosely to limit steam buildup.
Philly Cheesesteak Secrets: Full Recipe Workflow
Below is a reliable workflow that keeps timing tight and texture consistent. You’ll still adjust cheese type and vegetable mix based on taste. The core logic stays the same: thin slicing, fast cook, end-stage cheese melt.
Use this as your baseline for Philly cheesesteak success. Then tweak only one variable at a time. That way you learn what actually changes your results.
Prep and Cook Time
Set up your station before the first strip touches the griddle. This prevents slowdowns that ruin browning.
- Preparation: 15 minutes
- Cooking: 12 minutes
- Total: 27 minutes
Yield
This recipe makes 4 hearty sandwiches. The exact yield can shift if you cut thicker slices or use larger rolls.
For more control, cook in batches if your griddle space demands it. Overcrowding hurts sear and increases steaming.
Difficulty Level
Medium overall. You need patience for prep and speed during cooking.
If you can slice thin and manage heat, you can build these sandwiches reliably. Focus on timing rather than trying to “cook longer.”
Ingredients
Choose ingredients that match the process. Good Philly cheesesteak texture starts before heat.
- 1 lb ribeye steak, thinly sliced against the grain
- 2 large yellow onions, thinly sliced
- 2 green bell peppers, thinly sliced
- 1 tablespoon olive oil
- 1 tablespoon unsalted butter
- Salt and freshly ground black pepper, to taste
- 8 slices provolone cheese (or American cheese for a classic-style melt)
- 4 hoagie rolls, lightly toasted
Choose rolls that hold shape. Soft rolls work only if you toast and assemble quickly. Also confirm your cheese melts well when covered and heated briefly.
Instructions
Follow the sequence closely. It drives the final texture more than any single ingredient.
- Prepare the beef: Chill the ribeye for about 20 minutes before slicing. Slice ultra-thin against the grain so each strip cooks quickly.
- Cook onions and peppers: Heat olive oil and butter in a large skillet. Add onions and peppers, season lightly, and sauté until golden and tender, about 8 minutes.
- Sauté the ribeye: Push vegetables to the side. Add beef in a single thin layer. Cook about 2 minutes without stirring to develop browning, then toss and cook until just done, about 2 more minutes.
- Melt the cheese: Divide steak mixture among opened hoagie rolls. Layer cheese on top. Cover with a lid or foil and melt for about 1–2 minutes.
- Build and serve: Close sandwiches gently and serve immediately. Add extra peppers and onions if you want more of that sweet topping.
Keep timing tight. Steak and cheese taste best while everything still feels hot and fresh. If you must hold for a minute, cover loosely to reduce steam that softens the bread too fast.
Tips for Success (and Common Mistakes to Avoid)
Cheesesteaks fail in predictable ways. The good news is that you can prevent most issues with heat control and prep accuracy.
Use this checklist like a quick diagnosis. If your first attempt misses the mark, adjust one step and try again.
- Meat slicing: Use sharp knives and keep the steak slightly chilled. Consistent thin slices cook evenly.
- Alternatives for cheese: Provolone gives a mild, creamy melt. American-style cheese melts smoother and stays gooier longer.
- Sauté slowly: Golden onions and peppers need steady heat. Aim for soft sweetness, not dark bitterness.
- Make-ahead: You can sauté onions and peppers up to a day ahead. Reheat gently to keep texture.
- Roll choice: Lightly toast hoagie rolls so they resist steak juices. Serve fast after assembling.
Fixing Texture: Too Tough? Too Greasy? Too Soft?
If the steak tastes tough, your slices likely ran too thick or you cooked too long. Next time, thin the slices and shorten the cook time. Focus on sear, not extended heat.
If the sandwich turns greasy, the cheese probably spent too long on heat. Melt briefly under cover, then plate right away. Also avoid heavy pre-salting that can amplify sharpness and moisture issues.
Serving Suggestions That Match the Philly Cheesesteak
Pair your Philly cheesesteak with sides that bring crunch and contrast. Salt and crisp texture balance the rich meat and melted cheese.
Pick sides you enjoy, but keep the flavor profile compatible. Cool sauces can work well if they don’t overpower the steak’s savory base.
For a regional-food context that fits street-food comfort style, see American cuisine. Cheesesteaks match the pattern: simple ingredients, strong technique, and tight timing.
FAQ
These quick answers help you dial in your Philly cheesesteak workflow. Use them while cooking so you can correct problems fast.
When you keep the process consistent, results become repeatable instead of accidental.
What truly defines an authentic Philly cheesesteak?
An authentic Philly cheesesteak centers on thin ribeye, a melting cheese layer, and a soft hoagie roll that supports the filling. The key is balance—simple ingredients, timed cooking, and a hot, cohesive bite.
Technique drives authenticity. Heat contact, slice thickness, and end-stage melting create the signature texture you want.
How thin should the steak be?
Slice it thin enough to fold easily, yet still keep its shape. Thin slices cook fast on a hot surface and stay tender instead of chewy.
If you can see slight translucence at the edges, you’re in the right direction. Still, aim for consistent thickness more than extreme thinness.
Which cheese works best for melting?
Provolone works well for a classic melt and mild flavor. American-style cheese melts smoothly and stays gooey. Choose cheese that melts cleanly when covered for a short time.
For best results, keep melt time brief. Cover helps cheese flow without overheating fat.
Should I add onions at the beginning or the end?
Add onions and peppers at the end. Cooking vegetables early releases moisture and cools the pan, which reduces browning. Finish steak first, then reintroduce vegetables briefly.
This keeps the beef sear intact and prevents mushy peppers.
Do I need to toast the hoagie roll?
Yes. Light toasting builds structure so bread resists juices and stays easy to bite. Toast just enough to protect the roll without drying the sandwich.
If your roll stays soft after assembly, reduce toast time slightly next round. If it collapses, toast a bit more or serve immediately after melting.
See also: Philly cheesesteak