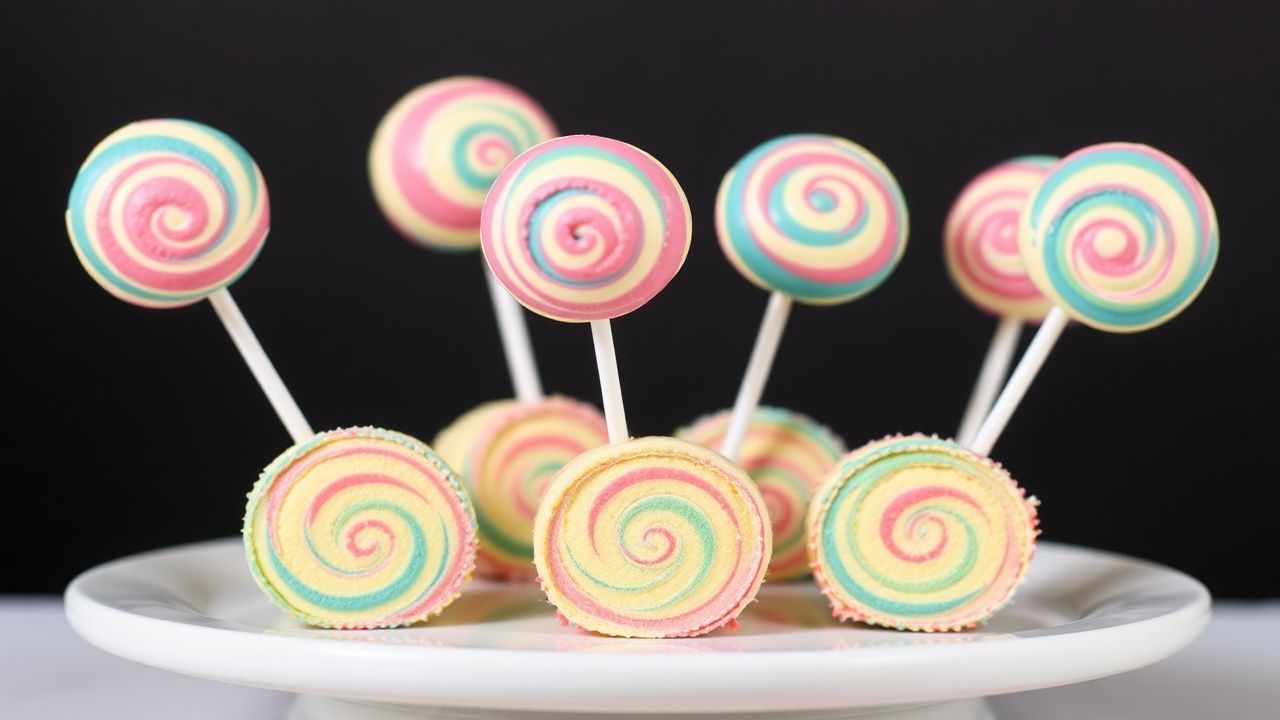
Rattle Cake Pops for baby showers turn a classic cake-pop idea into a playful keepsake. Each bite brings bright color, tender crumb, and a mini “rattle” look that guests love to photograph.
- Theme-ready: Use pastel coatings and rattle-shaped decorations for instant baby-shower style.
- Texture matters: Mix cake and frosting until the dough holds its shape.
- Clean dipping: Chill the pops to reduce cracking and streaks.
- Plan for serving: Stand them securely so they set upright.
These pops work well as a dessert table centerpiece, a party favor, or a sweet add-on to cupcakes and macarons. They also fit common event logistics because they travel easily and portion cleanly.
Rattle Cake Pops combine the fun of baby-themed design with the familiar flavor profile of cake and coating. You control sweetness by choosing your cake mix and frosting type, then you tune the look with color gels and edible glitter.
To keep your results reliable, focus on a few technical steps: proper chilling, smooth candy-melt tempering, and consistent ball sizing. If you do those three things, your finished pops will look polished even when you bake at home.
What Are Rattle Cake Pops?
Rattle Cake Pops are cake balls on sticks, coated in candy melts, and decorated to resemble baby rattles. The “handle” portion often uses fondant, candy detailing, or painted lines that mimic a rattle shape.
Because they use cake crumbs bound with frosting, they keep the same moist, scoopable texture as traditional cake pops. The coating then seals the surface, so the outside stays clean while you display or transport them.
If you’re new to cake pops, learn the core method: bake cake, crumble, mix with frosting, roll or mold, then dip and set. For background on cake structure and crumb behavior, see cake on Wikipedia.
For the coating side, candy melts behave like a confectionery fat system, so heat control matters. Candy melts are a type of chocolate substitute; you can explore the basics through chocolate and related confection concepts.
Why They Fit Baby Shower Themes
Baby showers focus on soft colors, playful shapes, and photo-friendly details. Rattle Cake Pops check all three boxes because the pastel coating creates instant visual contrast.
You can match the color palette to the invitation: blush pink, powder blue, buttery yellow, and mint green. That flexibility makes them a strong choice for both themed showers and simple home gatherings.
Decoration also drives the theme. Edible pearls and sugar accents add “tiny toy” vibes, while rattle-like handles create a clear silhouette from across the table.
For ideas on color usage in food styling, review food coloring and how dyes and gels behave in desserts.
Prep and Cook Time
Plan your day around two phases: baking and chilling. Baking is quick, but chilling and setting control your final texture.
Preparation: 30 minutes
chilling/Setting: 2 hours
Total Time: Approximately 2 hours 30 minutes
Yield and Difficulty Level
This recipe style makes enough for a typical small-to-medium baby shower dessert table. If you need more, scale by batch.
Yield: Yields approximately 24 cake pops.
Difficulty: Medium. You’ll get the best results if you work slowly with chilling and dipping.
Ingredients for Rattle Cake Pops
Use simple, consistent components. When ingredients stay predictable, your dipping and decorating stay predictable too.
Base
• 1 box vanilla cake mix (plus eggs, oil, water as called for on the box)
• 1 cup cream cheese frosting, softened
Coating and decoration
• 12 oz white candy melts (for coating)
• Food coloring gels: pastel blue, pink, yellow, and green
• Edible glitter and shimmer dust (optional)
• Miniature candy pearls and sugar stars for decoration
• Wooden cake pop sticks
• Styrofoam block or cake pop stand (for drying)
• Sprinkles shaped like rattles and hearts (optional)
If you want a deeper understanding of cake mixing fundamentals, see cake mix on Wikipedia. It helps clarify what boxed mixes already contain and why you should follow the package directions.
Instructions: How to Make Rattle Cake Pops
Follow the steps in order. When you rush between baking, crumbling, chilling, and dipping, the surface shell often cracks or the ball slides off the stick.
1) Bake the cake
Prepare batter per package instructions. Pour into a greased 9×13-inch pan and bake until a toothpick comes out clean, about 30–35 minutes. Let the cake cool completely.
2) Crumble & mix
Crumb the cooled cake into a large bowl until fine crumbs form. Add 1 cup cream cheese frosting and fold until the mixture holds together but stays soft and moist.
3) Shape the cake pops
Scoop about 2 tablespoons per pop and mold into a sphere. For rattle-inspired styling, shape slightly elongated forms or rounded “handle” silhouettes.
4) Chill the pops
Insert sticks halfway into each shaped pop. Freeze 15–20 minutes to firm up before dipping.
5) Prepare coating
Melt candy melts in microwave-safe bowls in 30-second bursts, stirring between bursts until smooth. Divide into bowls and tint with pastel gels. Stir gently for even color.
6) Dip & decorate
Hold the stick and dip one cake pop into the coating. Cover it fully, then tap off excess. While the coating is still fresh, add pearls, shimmer dust, and sprinkles. For rattle detailing, paint tiny lines or dots with a toothpick using a contrasting color.
7) Dry standing up
Insert sticks into a Styrofoam block or cake pop stand. Let them set upright for 20–30 minutes.
8) Finishing touches
Add sugar stars or delicate edible accents near the “handle” area. Use a small brush for shimmer highlights if you want a brighter rattle look.
Because candy melts rely on fat crystallization and controlled heat, avoid frequent high-heat microwaving. For general cocoa/fat concepts, you can reference cocoa butter for the idea of fat behavior in chocolate-like coatings.
Tips for Success (Quality, Texture, and Timing)
Success comes from control, not complexity. Your goal is a smooth shell that sets quickly on a firm cake center.
Consistency is key: Cake pop dough should stay moldable without feeling wet. Add frosting cautiously to avoid a sticky dough that deforms during dipping.
Keep candy melts temperate: Overheated melts can thicken and become clumpy. Melt in short bursts and stir often so the coating stays glossy and fluid.
Use pastel colors: Soft shades read “baby shower” fast. Pastels also blend well with white candy melts and reduce the harshness of very strong food colors.
Make ahead: Refrigerate pops for up to 3 days in an airtight container. Wait to add the most delicate decorations until closer to serving if you want maximum shine.
Variations: Swap vanilla cake mix for funfetti or lemon for different flavor notes. You can also add a small amount of flavored extract to frosting if your audience likes that profile.
Allergy-minded approach: If guests have allergies, check boxed mix ingredients and frosting ingredients carefully. Also keep tools clean and separate if you use allergen-heavy products at home.
Serving Suggestions for Baby Shower Bliss
Display style affects the entire dessert-table vibe. When pops stand upright and look uniform, guests assume they took more time than they did.
Use charming holders like a rustic wooden crate lined with paper, or a white ceramic vase filled with decorative fillers. Keep the sticks straight so the “rattle” shape stays visible from multiple angles.
Then add baby-shower personalization. Attach small name tags or themed flags to the sticks so each guest feels included. You can also pair the pops with pastel cupcakes and macarons to create a cohesive sweet spread.
For beverage pairing, offer a non-alcoholic sparkling punch or a vanilla milkshake station. Guests can customize with sprinkles so the dessert theme extends beyond the main table.
For general guidance on event food safety and storage, review food safety. It supports smart handling decisions around refrigeration and serving time.
Planning tip: Set up your drying block before you start dipping. This reduces downtime and helps the coating set at a consistent speed.
Nutrition Snapshot (Per Pop)
Nutrition varies by cake mix brand, frosting type, and coating thickness. Use the table below as an estimate for planning portions.
Estimated nutritional info (per pop)
| Nutrition Info (per pop) | Calories | Protein | Carbs | Fat |
|---|---|---|---|---|
| Rattle Cake Pops | 150 | 2g | 25g | 5g |
FAQ: Rattle Cake Pops for Baby Showers
What exactly are rattle cake pops?
They are cake balls on sticks coated in candy melts, then decorated to resemble baby rattles. The handle look comes from shaped detailing and small rattle-like accents.
How do I make the coating smooth?
Use gentle heat in short bursts and stir often. Chill the cake balls first so the coating sets quickly and stays intact during dipping.
What colors work best for baby shower themes?
Pastels like pink, baby blue, mint, and pale yellow look soft and festive with white candy melts. Keep colors evenly tinted so you avoid streaks.
Are rattle cake pops difficult for beginners?
They’re beginner-friendly if you respect the process steps. Bake fully, crumble finely, mix thoroughly, and chill before dipping.
How long can I make them ahead?
Plan for up to 3 days in the fridge in an airtight container. Add the most delicate toppings right before serving for the best texture and shine.
Final note: When you combine calm technique with thoughtful decoration, your Rattle Cake Pops become a sweet signature for the whole baby-shower celebration.
See also: Rattle Cake Pops