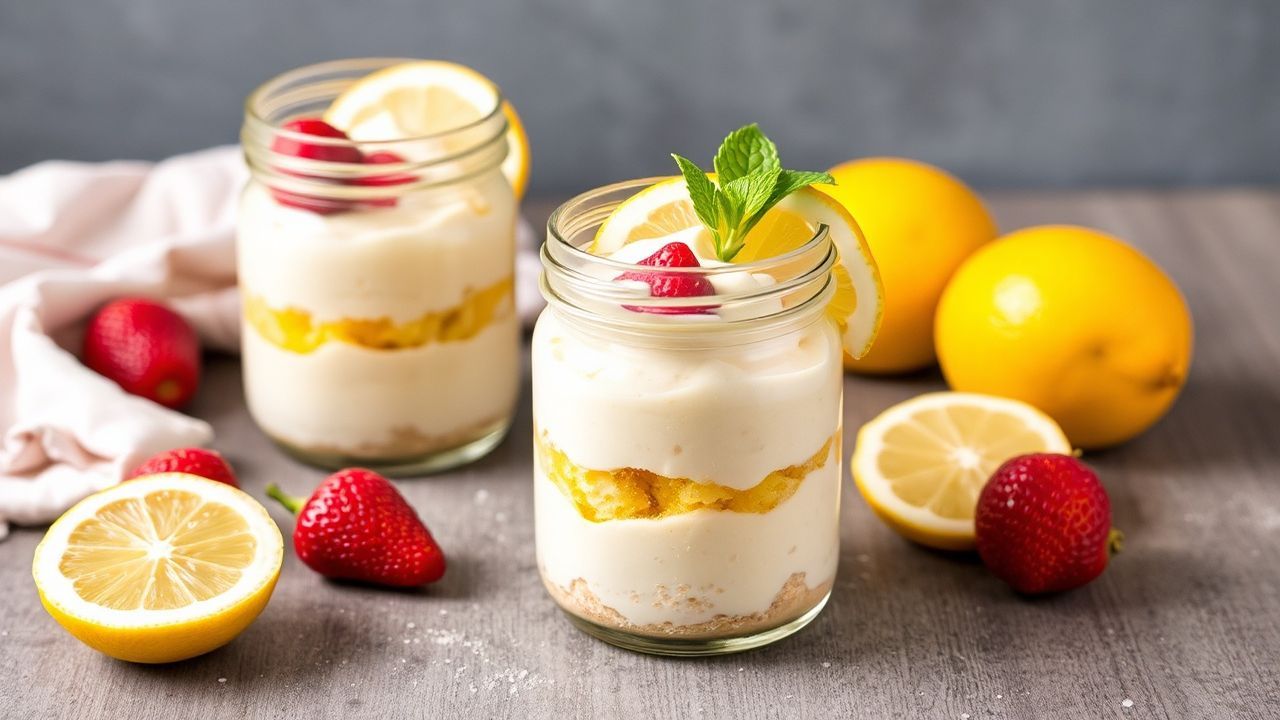
When you want a dessert that feels bright and light, these no-bake lemon cheesecake jars deliver exactly that. They blend tangy lemon flavor with a creamy, chilled filling—no oven heat, no complicated baking steps, and no long wait to serve.
- Zesty No-Bake Lemon Cheesecake Jars: What Makes Them “Healthy”
- Prep, Chilling, and Yield
- Ingredients for Healthy No-Bake Lemon Cheesecake Jars
- Step-by-Step Assembly Tips for Perfect Lemon Cheesecake Jars
- 1) Prepare the crust
- 2) Distribute and press the crust
- 3) Chill the crust
- 4) Make the lemon cheesecake filling
- 5) Optional firmer set with gelatin
- Expert Insight: stop “overmixing” after the filling turns glossy
- Creative Garnishes for Zesty No-Bake Lemon Cheesecake Jars
- Chef’s Notes: Substitutions, Storage, and Consistent Results
- Nutritional Information (Approximate)
- FAQs: Healthy No-Bake Lemon Cheesecake Jars
At a Glance: Key Takeaways
- No-bake method relies on chilling and setting, not oven baking.
- Lemon zest + juice creates a vivid, zesty flavor.
- Greek yogurt keeps the texture creamy while improving “lighter” balance.
- Layered jars make portioning easy for parties and weeknight treats.
In fact, a no-bake cheesecake style sets mainly through dairy structure and optional gelatin. Gelatin forms a gel network as it chills, which helps the jars hold their shape when you scoop and serve. If you want the science behind this, see gelatin.
These jars taste like classic cheesecake but feel more refreshing. The crust stays firm from crushed crumbs plus fat, while the lemon filling stays smooth thanks to proper mixing and enough chilling time.
Zesty No-Bake Lemon Cheesecake Jars: What Makes Them “Healthy”
The word “healthy” here comes from smart ingredient swaps and portion control. You use lower-fat cream cheese and Greek yogurt instead of heavier creams, so the filling tastes rich without feeling heavy.
Also, lemon brings natural acidity and aroma that lets you keep sweetness moderate. That balance matters because high sweetness can mask tangy notes, while proper lemon flavor keeps the dessert lively.
If you want a quick guide to how yogurt works in baking and desserts, review yogurt. In this recipe, it supports a creamy mouthfeel and helps thin the mixture just enough for a silky spoon.
Flavor chemistry: why lemon tastes brighter
Lemon zest holds aromatic oils that feel more intense than juice alone. That’s why this recipe uses both juice and zest, and why the zest addition hits hard right at first bite.
For background on citrus oils and what zest contributes, you can explore lemon. It helps explain why zest improves aroma and “freshness” perception.
Prep, Chilling, and Yield
Plan for time mostly through chilling. You spend around 15 minutes prepping, and then the jars set in the fridge so the filling becomes thick and scoopable.
Because jars vary by size, start by portioning evenly. Consistent jar size gives consistent texture and makes serving at gatherings much easier.
Time breakdown
- Prep Time: 15 minutes
- Chilling Time: 2 hours (minimum)
- Total Time: 2 hours 15 minutes
Yield and difficulty
This recipe makes 6 individual cheesecake jars (about 6 oz each). It stays rated easy, even if you bake rarely.
You only need basic tools: mixing bowls, a whisk or mixer, spoons, and clean jars. The most important step is thorough mixing so the filling stays lump-free.
Ingredients for Healthy No-Bake Lemon Cheesecake Jars
Gather your ingredients first, then work in order. That reduces mistakes and helps you finish with clean, even layers.
For sweetening, the recipe uses powdered erythritol or powdered sugar. Powder form matters because it dissolves faster, which helps the filling feel smooth.
Crust ingredients
- 1 ½ cups graham cracker crumbs (lightly crushed)
- 3 tbsp melted coconut oil (or unsalted butter)
Filling ingredients
- 1 cup low-fat cream cheese (softened)
- ¾ cup Greek yogurt (plain, nonfat)
- ½ cup powdered erythritol (or sifted powdered sugar)
- ½ cup fresh lemon juice (strained)
- 1 tsp lemon zest (finely grated)
- 1 tsp pure vanilla extract
- 1 tbsp gelatin powder (optional, for firmer set)
- 3 tbsp warm water (if using gelatin)
Pro-Caution: gelatin consistency and heat control
If you use gelatin, bloom it in warm water first. Then warm it gently until dissolved and mix it in right away.
Avoid overheating, and don’t let gelatin sit too long before mixing, or it may start to thicken in the bowl. For general gelatin basics, see gelatin.
Step-by-Step Assembly Tips for Perfect Lemon Cheesecake Jars
Follow the sequence closely. The crust needs a short chill so it firms up, and the filling needs proper mixing plus enough fridge time to set.
Also, keep your jars clean and dry. Any oily residue or moisture can affect how neatly the layers hold.
1) Prepare the crust
In a medium bowl, mix graham cracker crumbs with melted coconut oil. Stir until every crumb looks evenly coated and feels like damp sand.
This step matters because an even coating creates a stable base. If the crust feels dry, add a small splash more melted fat. If it feels greasy, chill longer before filling.
2) Distribute and press the crust
Divide the crust mixture among 6 small jars. Press gently with the back of a spoon to form a flat, even layer.
Press firmly enough to hold together, but don’t pack it like a brick. A lightly compacted crust scoops better and stays pleasant in texture.
3) Chill the crust
Refrigerate the jars for 10–15 minutes. This firms the crust so the filling won’t mix into the base.
While the crust chills, you can prepare the filling mixture so you don’t rush later.
4) Make the lemon cheesecake filling
Beat the softened cream cheese until smooth. Then add Greek yogurt, powdered sweetener, lemon juice, lemon zest, and vanilla.
Mix until fully combined and lump-free. Smooth texture depends on softened cream cheese, so let it sit at room temperature before you start.
5) Optional firmer set with gelatin
If you want a firmer cheesecake jar, dissolve gelatin in warm water and let it bloom for 5 minutes. Stir until smooth, then mix into the filling immediately.
Once mixed, keep the filling moving so it spreads evenly across the jars without streaks.
[TIP]Expert Insight: stop “overmixing” after the filling turns glossy
Mix until the filling turns glossy and uniform, then stop. Overmixing after that point can add extra air, which may slightly soften the set when chilled.
Creative Garnishes for Zesty No-Bake Lemon Cheesecake Jars
Garnishes add aroma and visual contrast. They also help your jars look special without changing the core recipe.
Choose toppings that match the citrus theme and keep sweetness in check so the lemon stays bright.
Easy garnish ideas
Top each jar with a thin curl of lemon zest for a fresh, fragrant finish. Add a small sprig of mint to cool the flavor and brighten the presentation.
Then consider thin slices of candied ginger or a few fresh raspberries for sweet-tart contrast. For crunchy topping, sprinkle toasted slivered almonds or crushed pistachios right before serving.
If you want deeper context on how nuts contribute texture in desserts, you can reference almonds or pistachio on Wikipedia.
Chef’s Notes: Substitutions, Storage, and Consistent Results
Small changes can still keep the final texture right. Use these notes to swap ingredients while preserving the jar structure and lemon flavor.
For best results, test your substitution once if you plan to serve for guests. Then you can adjust sweetness or thickness confidently next time.
Substitutions for crust
Swap graham crackers for a gluten-free crumb blend or finely ground oats. Coconut oil can become unsalted butter for a richer, more classic taste.
Because different crumbs absorb fat differently, watch the crust texture. It should feel damp and cohesive, not dry or crumbly.
Sweetener options
Use natural sweeteners like maple syrup or agave if you prefer. Keep in mind that liquid sweeteners can change thickness and may require slight chilling adjustments.
Powdered sweeteners dissolve faster, which is why they create the smoothest filling. If you use liquid sweetener, mix longer and chill until the filling sets firmly.
Make-ahead and storage
Make these jars up to 2 days ahead. Add garnish right before serving to keep zest aromatic and nuts crisp.
Store jars in airtight containers in the refrigerator. They typically stay best within 3–4 days because citrus freshness slowly fades over time.
Fixes for a too-soft filling
If your filling feels soft after chilling, add gelatin next time or ensure you used enough gelatin for the batch. Also check that your cream cheese was fully softened, and that you mixed thoroughly.
Another common cause is under-chilling. Give the jars at least 2 hours, and for the firmest texture, chill overnight.
Nutritional Information (Approximate)
Nutritional values vary based on brand choices and jar size. Use the estimate below as a practical guide, not a strict medical measure.
If you track macros, weigh your jars or use a consistent portion scoop so each serving matches the same size.
| Per Serving | Calories | Protein | Carbs | Fat |
|---|---|---|---|---|
| 1 jar (approx.) | 210 | 7g | 15g | 12g |
FAQs: Healthy No-Bake Lemon Cheesecake Jars
Most questions come down to texture, sweetness, and timing. Use these quick answers to troubleshoot and serve with confidence.
What makes no-bake lemon cheesecake jars set without baking?
The crust sets from fat firming in the fridge, while the filling sets through dairy structure and optional gelatin. Proper chilling time allows the mixture to thicken and hold shape when scooped.
How can I make the lemon flavor stronger?
Use both lemon juice and finely grated zest. Zest adds aromatic oils that boost perceived brightness, so add it to the filling and garnish with a little extra right before serving.
Can I make these jars with a firmer texture?
Yes. Use the optional gelatin and bloom it correctly in warm water. Then mix it into the filling immediately and chill at least 2 hours, or overnight for the firmest result.
How long do they last in the refrigerator?
Store the jars airtight in the refrigerator for about 3–4 days. For best taste and aroma, keep garnish separate until serving day.
Are there dairy-free or vegan options?
You can adapt the recipe by swapping cream cheese and yogurt for plant-based alternatives. For a dairy-free version, choose products that whip or blend smoothly so the filling stays creamy and sets with chilling. You can also use agar-agar for vegan thickening, but the exact ratio may differ.
Note: Any substitution may change set time and texture, so adjust by chilling longer when needed.
See also: no-bake lemon cheesecake