
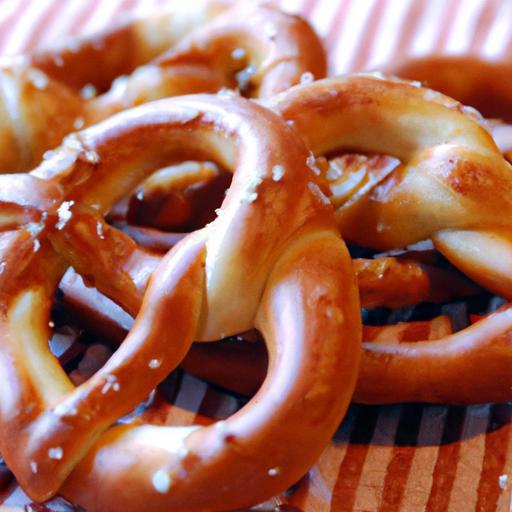
There’s something undeniably magical about the warm, golden crust and pillowy softness of a freshly baked pretzel, especially when it’s adorned wiht just the right sprinkle of classic coarse salt. Homemade pretzels are more than just a snack-thay’re a comforting experience that brings the cozy charm of a Bavarian bakery right into your kitchen. In this article, we’ll guide you through the art of crafting perfectly soft homemade pretzels, revealing tips and techniques that ensure each bite boasts the ideal balance of chewiness, flavor, and that signature salty finish. Whether you’re a seasoned baker or a curious newbie, get ready to twist, boil, and bake your way to snack-time perfection.
Crafting the Ideal Dough for Soft and Chewy Pretzels
Perfectly Soft Homemade Pretzels Topped with Classic Salt start with a dough that strikes a delicate balance between tender softness and a pleasantly chewy bite-a hallmark of any great pretzel.This timeless treat, rooted in bavarian tradition, transforms humble ingredients into a golden masterpiece with a rich aroma and inviting texture. Whether it’s a family gathering or a cozy afternoon snack, mastering this dough brings that authentic bakery experience right into your own kitchen.
Prep and Cook Time
- Readiness: 20 minutes
- Rising time: 1 hour 15 minutes
- Boiling and baking: 20 minutes
- Total time: Approximately 1 hour 55 minutes
Yield
10 to 12 soft, golden pretzels
difficulty Level
Medium – approachable for home bakers with some experience
Ingredients
- 4 cups all-purpose flour, sifted
- 1 ½ cups warm water (about 110°F / 43°C)
- 2 teaspoons active dry yeast
- 1 tablespoon granulated sugar
- 2 teaspoons kosher salt, plus more for topping
- 3 tablespoons unsalted butter, melted and cooled
- 10 cups water (for boiling)
- ⅔ cup baking soda (crucial for that shiny crust)
- Coarse pretzel salt or flaky sea salt, for finishing
Instructions
- Activate the yeast: In a small bowl, combine the warm water, yeast, and sugar. Stir gently and let it rest for 5-7 minutes until frothy. This signals your yeast is alive and ready.
- Mix the dough: In a large mixing bowl, sift together the flour and salt. Add the melted butter and yeast mixture. Stir with a wooden spoon or dough hook attachment until combined.
- Knead for texture: Transfer dough to a clean, floured surface. Knead vigorously for about 8-10 minutes until smooth and elastic. You want a supple dough that bounces back when pressed.
- Let it rise: Place the dough in a lightly oiled bowl,cover with a damp cloth or plastic wrap,and let it rise in a warm spot for 1 hour or until doubled in size.
- Shape the pretzels: Punch down the dough and divide it into 10-12 equal portions. Roll each piece into a 20-inch rope. Twist each rope into the classic pretzel shape, pressing the ends firmly to seal.
- Prepare the baking soda bath: preheat your oven to 450°F (232°C). In a large pot, bring 10 cups of water and the baking soda to a gentle boil. Carefully drop 2-3 pretzels at a time into the boiling water. Boil for 30 seconds on each side-this crucial step creates that signature chewy outer layer and glossy finish.
- Drain and season: Remove pretzels with a slotted spatula and place them on a parchment-lined baking sheet. Instantly sprinkle generously with coarse salt or flaky pretzel salt. For additional flair, try a dash of garlic powder or caraway seeds.
- Bake to golden perfection: Bake the pretzels for 12-15 minutes, rotating the tray halfway, until they develop a deep golden brown crust and release a mouthwatering aroma of toasted dough and butter.
- Cool briefly and serve: Let your soft pretzels rest for 5 minutes on a wire rack before serving warm with mustard or your favorite dip.
Chef’s Notes: Enhancing Your Perfectly Soft Homemade Pretzels topped with Classic Salt
- Hydration balance: Adjust water slightly if your dough feels too sticky or dry. Higher hydration yields a softer crumb.
- Yeast alternatives: Instant yeast can replace active dry yeast with no need to proof-but keep an eye on dough rising times.
- boiling tips: Don’t skip the baking soda bath-this alkaline soak is vital for texture and color. Use care when handling to avoid splashing.
- salt swapping: While classic pretzel salt is ideal, flaky sea salt or even toasted sesame seeds offer delightful variations.
- Make-ahead option: You can prepare the shaped pretzels and refrigerate overnight before boiling and baking. Let them come to room temperature for 30 minutes first.
- Storage: Best enjoyed fresh, but keep leftovers in an airtight bag for up to two days and reheat in the oven for crispness.
Serving Suggestions
Present your soft and chewy pretzels alongside a rustic wooden board adorned with small bowls of spicy brown mustard, honey mustard, or a creamy cheese dip. Garnish with freshly chopped parsley or a light brush of melted butter before serving for an extra glossy finish. Pair these golden beauties with a side of crisp pickles or crunchy veggies for a truly balanced snack or light meal.
| Nutritional Information (per pretzel) | Amount |
|---|---|
| Calories | 210 kcal |
| Protein | 6 g |
| Carbohydrates | 40 g |
| Fat | 4 g |

For those eager to explore more baking adventures, be sure to check out our Ultimate Homemade Bagels recipe, which shares some techniques complimentary to your pursuit of perfect pretzel dough.
For detailed insights into the science behind the baking soda bath, consult this Serious Eats article that explores how alkalinity transforms dough into that iconic pretzel crust.
Q&A
Q&A: Perfectly Soft Homemade Pretzels Topped with Classic Salt
Q: What makes a homemade pretzel perfectly soft instead of chewy or tough?
A: The secret lies in the balance of ingredients and technique. Using bread flour for a bit of structure, but not overworking the dough, keeps the pretzels tender. Allowing the dough to rest and rise properly creates air pockets that yield a soft crumb. The magic touch: briefly dipping the shaped dough into a baking soda bath before baking gives that signature pretzel texture-slightly chewy on the surface, soft inside.
Q: Why is a baking soda bath necessary for soft pretzels?
A: The baking soda bath alkalizes the dough’s surface, which caramelizes during baking, giving pretzels their iconic deep golden-brown color and classic flavor. It also contributes to the slightly crispy exterior while maintaining the soft interior-just the right contrast in every bite.
Q: Can I use regular table salt to top my pretzels, or is specialty pretzel salt better?
A: Pretzel salt is preferred becuase it’s coarser and doesn’t dissolve too quickly, providing that satisfying crunch and bursts of saltiness on the tongue. Though, if you don’t have pretzel salt, lightly crushing coarse sea salt or kosher salt makes a great substitute. Table salt is usually too fine and tends to melt into the dough, losing that characteristic salty pop.
Q: How do I shape pretzels to get that customary twisted look?
A: Start by rolling your dough into long ropes about 18 inches in length. Form a U-shape with the rope, then cross the ends over each other twice, and finally fold them down toward the bottom of the U, pressing the ends gently into the dough base. It takes a little practice,but each twist seals the classic pretzel silhouette.
Q: Is it necessary to let the pretzels proof after shaping?
A: yes! A short second rise-about 20 to 30 minutes-helps the dough relax, promoting soft texture and fluffiness after baking. Skipping this might yield denser pretzels that miss that pillowy softness we crave.
Q: Could I add other toppings besides classic salt but still keep the pretzels authentic?
A: Absolutely! While classic coarse salt is timeless, you can experiment with savory options like sesame seeds, poppy seeds, or even a sprinkle of garlic powder for a subtle twist. Just remember,these toppings complement rather than overpower the pretzel’s rich,slightly sweet dough and iconic crust.
Q: How do I store homemade pretzels to keep them soft?
A: The best way is to cool them fully, then store in an airtight container or resealable bag at room temperature. For longer storage,freeze them wrapped tightly. When ready to enjoy, gently warm them in the oven wrapped in foil to revive that fresh-from-the-oven softness.
Q: Can I make these pretzels vegan?
A: Definitely! This recipe is naturally plant-based, using a simple blend of flour, water, salt, yeast, and a touch of sugar. Just swap butter (if used in brushing) for plant-based margarine or olive oil for that shiny, golden finish. the result remains irresistibly soft and savory.
Q: What’s the best way to achieve that shiny pretzel crust without using egg wash?
A: The traditional shiny crust comes from brushing the pretzels with melted butter after baking, which enhances flavor and gloss. For an egg-free method before baking, the baking soda bath itself helps create that classic sheen. Alternatively, a light application of olive oil or plant-based butter immediately post-bake will add a beautiful luster.
Q: Can I make pretzel bites using this recipe?
A: Absolutely! Simply cut your dough ropes into smaller pieces before the baking soda bath. Pretzel bites bake faster-usually 8 to 10 minutes-and make perfect bite-sized snacks or party treats topped with classic salt or your favorite seasoning.
Future Outlook
And there you have it-a foolproof recipe for perfectly soft homemade pretzels topped with that irresistible sprinkle of classic salt. Whether enjoyed fresh from the oven or warmed up later, these pretzels bring a comforting blend of chewy dough and savory crunch straight to your kitchen. So next time the craving hits, skip the store-bought and treat yourself to this delightful snack made with your own hands-because nothing beats the simple joy of biting into a warm, salty, soft pretzel crafted just for you. Happy baking!