
Ther’s something undeniably captivating about the sizzle of bread over an open flame-the way it crisps and chars, transforming simple dough into an aromatic, golden masterpiece. Enter the world of savory grilled bread sticks: a culinary delight that marries rustic simplicity with bold, smoky flavors.Whether enjoyed as a tantalizing appetizer, a satisfying snack, or a creative side, thes skewered treats invite you to explore the art of grilling beyond the ordinary. In this article, we’ll delve into the secrets of mastering savory grilled bread sticks, from selecting the perfect dough and seasoning to achieving that ideal charred finish. Prepare to elevate your grilling game and discover a skewered delight that’s as versatile as it is indeed irresistible.
Choosing the Perfect Dough for Irresistible Grilled Bread Sticks
Skewered Delight: mastering Savory Grilled Bread Sticks begins with selecting the ideal dough-a foundation that can make or break this simple yet elegant dish. For grilled bread sticks,the best dough strikes a balance between airy tenderness and enough structure to hold up on skewers over open flames. Customary pizza dough or a no-knead artisan bread dough with high gluten content works beautifully, offering a chewy, flavorful bite that crisps delightfully on the grill.
When crafting your dough, aim for a medium hydration level (around 65% water to flour ratio) to achieve elasticity that will stretch onto skewers without snapping. Incorporating a bit of olive oil enriches the dough with moisture and enhances crispness during grilling. avoid overly soft focaccia or enriched doughs,as they tend to slacken under heat, losing that coveted charred crunch.
Marinating and Seasoning Secrets to Elevate Every Skewer
Once your dough is perfectly prepped, the next step is the marinade-your bread sticks’ flavor passport. A simple yet potent mixture of extra virgin olive oil, fresh garlic, herbs like rosemary and thyme, and a hint of crushed chili flakes infuses each skewer with irresistible aroma and depth.
Brush the dough generously before grilling, allowing the marinade to soak in while the heat caramelizes its herbs and garlic, creating an irresistible crust. For an herbaceous finish, toss the cooked bread sticks in a sprinkle of sea salt and freshly cracked black pepper immediately after grilling to lock in flavor complexity.
Grilling Techniques That Ensure Crispy Golden Perfection
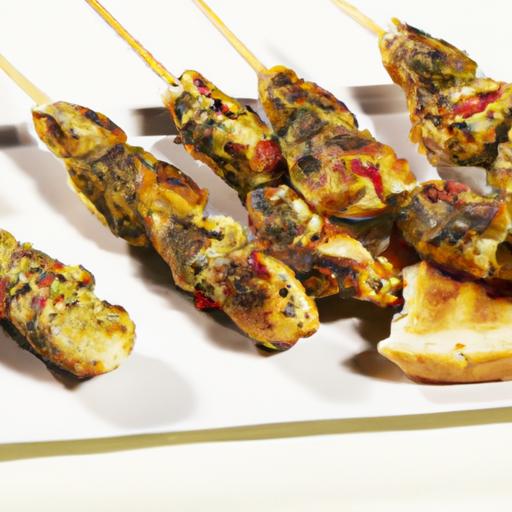
Grilling is where the magic transforms dough into a “Skewered Delight.” Preheat your grill to medium-high, ensuring the grates are clean and lightly oiled to prevent sticking. Thread dough strips onto soaked wooden or metal skewers evenly, leaving space between each piece for the heat to circulate.
- Start with indirect heat: Place skewers away from direct flames to gently develop structure and crumb. Grill for 3-4 minutes per side.
- Finish with direct heat: Move skewers over the hot zone for 1-2 minutes per side to achieve tantalizing grill marks and crisp edges without burning.
- Rotate regularly: Turn skewers every minute to develop uniform golden color and prevent soggy patches.
- watch for puff and color: The dough will subtly puff when air bubbles expand, signaling its time to flip.
Patience here pays off-overcooking leads to toughness, while undercooking yields doughy centers. The ideal grilled bread stick boasts a crackling crust with a light, pillowy interior.
Creative Serving Ideas to Impress and Satisfy every Palate
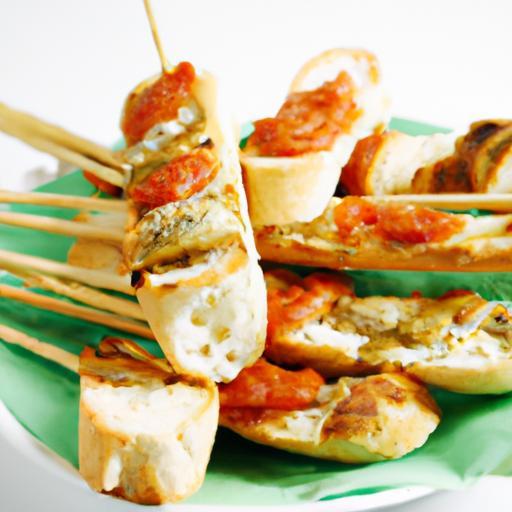
Served piping hot, these grilled bread sticks lend themselves to a variety of presentations that captivate both eyes and taste buds. For a rustic allure, pile them in a woven basket lined with parchment paper, garnished with a sprig of fresh rosemary and a small ramekin of velvety basil pesto or sun-dried tomato aioli for dipping.
Alternatively, layer the sticks atop a salad of vibrant arugula, heirloom cherry tomatoes, and shaved Parmesan, drizzled with balsamic glaze for a light yet luxurious bite. For a casual gathering, place skewers on a wooden board surrounded by marinated olives, roasted bell peppers, and a selection of artisan cheeses, inviting guests to create flavor combinations.
Don’t forget to sprinkle flaky sea salt or dust with flaky smoked paprika for a pop of color and bursts of umami. These little details elevate your presentation from simple to stunning, making your “Skewered Delight” unforgettable.
Prep and Cook Time
- Readiness: 20 minutes (includes dough resting time)
- Marinating: 10 minutes
- Grilling: 10 minutes
- Total: Approximately 40 minutes
Yield
Serves 4-6 as an appetizer or snack (about 12 skewers)
Difficulty Level
Medium - Ideal for cooks familiar with basic dough handling and grilling techniques
Ingredients
- 2 cups all-purpose flour, sifted
- 1 tsp instant yeast
- 1 tsp sugar
- ¾ cup warm water (110°F/43°C)
- 2 tbsp extra virgin olive oil, plus extra for brushing
- 1 tsp sea salt
- 2 cloves garlic, minced
- 1 tbsp fresh rosemary, finely chopped
- 1 tsp fresh thyme, finely chopped
- ¼ tsp crushed chili flakes (optional)
- Flaky sea salt, for finishing
Instructions
- Prepare the dough: In a large bowl, combine flour, yeast, sugar, and salt. Stir in warm water and olive oil until a shaggy dough forms. Knead on a floured surface for 8-10 minutes until smooth and elastic.
- First rise: Place dough in a lightly oiled bowl, cover with damp cloth or plastic wrap, and let it rise at room temperature for 1 hour or until doubled in size.
- Shape the bread sticks: Punch down the dough and roll it out to a ¼-inch thickness. Cut into ½-inch wide strips about 6 inches long. Thread 3-4 strips per skewer, leaving small gaps for heat circulation.
- Mix marinade: In a small bowl,combine olive oil,garlic,rosemary,thyme,and chili flakes. Brush generously over skewered dough strips.
- Grill: Preheat your grill to medium-high and oil grates. Place skewers on indirect heat for 3-4 minutes per side,then move to direct heat for 1-2 minutes per side to get grill marks. Turn frequently to avoid burning.
- Season and serve: Remove from grill, sprinkle with flaky sea salt and freshly cracked black pepper, then serve immediately with your favorite dips or accompaniments.
Tips for Success
- For a softer crumb, replace ½ cup of all-purpose flour with bread flour, increasing gluten development.
- If pressed for time, use store-bought pizza dough and simply add your seasoning before grilling.
- Soak wooden skewers for 30 minutes before grilling to prevent charring or burning.
- Make-ahead: Pre-shape skewers and refrigerate, covered, overnight. Allow them to come to room temperature for 30 minutes before grilling.
- Substitute thyme and rosemary with oregano or basil for a Mediterranean twist.
Serving Suggestions
- Serve with a trio of dips: roasted garlic hummus, smoky romesco, and lemon herb yogurt sauce.
- Pair alongside a fresh Mediterranean salad featuring cucumbers, kalamata olives, and cherry tomatoes.
- Garnish with microgreens, a drizzle of herb-infused olive oil, or a dusting of smoked paprika for visual appeal.
- top skewers with grated Parmesan or crumbled feta right after grilling for added richness.
| Nutrient | Per Serving (2 Skewers) |
|---|---|
| Calories | 180 kcal |
| Protein | 5 g |
| Carbohydrates | 28 g |
| Fat | 5 g |
Discover more grilled bread skewer recipes to expand your skewered delight arsenal,and for a scientific dive into crust development,visit The Culinary Institute of America’s baking science page.

Q&A
Q&A: Skewered Delight – Mastering Savory Grilled Bread Sticks
Q1: What makes skewered grilled bread sticks a unique snack or appetizer?
A1: Skewered grilled bread sticks offer a perfect combination of crispy, smoky char from the grill and soft, flavorful bread inside. Unlike traditional bread served as a side, grilling infuses the bread sticks with a tantalizing aroma and texture that elevates them from simple carbs to a savory delight, perfect for dipping or enjoying solo.
Q2: What types of bread work best for making grilled bread sticks?
A2: Sturdy breads with a bit of density hold up best on skewers and grilling. Think Italian ciabatta,baguette slices,or even focaccia cut into manageable sticks. These breads don’t fall apart easily yet toast beautifully,developing that sought-after crunchy crust while maintaining a tender interior.
Q3: How do you prepare the bread sticks before grilling?
A3: Start by cutting the bread into uniform sticks, about ½ inch thick. Then, brush them generously with olive oil infused with herbs like rosemary, garlic, or chili flakes for a burst of flavor. This not only adds taste but also helps achieve that perfect golden crust once on the grill.
Q4: Are there any tips for threading bread sticks onto skewers without them breaking?
A4: Absolutely! Use bamboo or metal skewers that are flat rather than round to prevent slipping. Also, slightly dry the bread sticks before skewering-fresh bread can be too soft and may crumble.Drying helps firm them up just enough to slide on easily without breaking.
Q5: How long and at what temperature should the bread sticks be grilled?
A5: Grill over medium-high heat for about 2-3 minutes per side.The goal is to get grill marks and a slight char without turning the bread sticks into hockey pucks. Keep an eye on them, as bread can go from perfectly toasted to burnt quickly!
Q6: What savory seasonings or toppings enhance grilled bread sticks?
A6: A sprinkle of sea salt, cracked black pepper, and a dusting of Parmesan or nutritional yeast works wonders. Fresh herbs like thyme, oregano, or basil add freshness, and a drizzle of garlic-infused olive oil or balsamic reduction provides a luxurious finish.
Q7: Can grilled bread sticks be paired with dips? If so, which ones are ideal?
A7: Grilled bread sticks shine alongside bold dips. Consider whipped feta, roasted red pepper hummus, creamy tzatziki, or garlic and herb-infused olive oil. Their crispy, smoky crunch creates a delightful contrast with creamy or tangy dips.
Q8: Are there creative ways to customize or dress up grilled bread sticks?
A8: Definitely! Try wrapping them lightly in grilled vegetables like peppers or zucchini before skewering or sprinkle with toasted seeds such as sesame or pumpkin for extra texture. You can also press fresh minced garlic onto them while warm for an extra punch.
Q9: How can you keep grilled bread sticks warm and crispy if served later?
A9: Place them in a warm oven (around 200°F/95°C) on a wire rack to avoid sogginess. Cover loosely with foil. This maintains warmth without steaming out the crispiness until ready to serve.
Q10: What occasions are skewered grilled bread sticks perfect for?
A10: They’re ideal for casual backyard barbecues,cocktail parties,or even elegant tapas-style dinners. Their portability on skewers makes them perfect for mingling events, and their bold flavor pairs beautifully with a wide array of savory bite-sized dishes.
Mastering skewered grilled bread sticks transforms a humble staple into a show-stopping treat bursting with smoky-savory goodness.Get ready to impress your guests with this deceptively simple, irresistibly flavorful delight!
Insights and Conclusions
As the smoky aroma of perfectly grilled bread sticks lingers in the air, it’s clear that mastering this savory delight is more than just a culinary skill-it’s an invitation to elevate simple ingredients into an unforgettable experience. Whether you’re a seasoned grill master or a curious home cook, these skewered delights offer endless opportunities to experiment with flavors, textures, and seasonings. So gather your skewers, fire up the grill, and let each golden, crispy bite be a celebration of creativity and shared moments. because in the world of grilled bread sticks, every stick tells a flavorful story waiting to be savored.