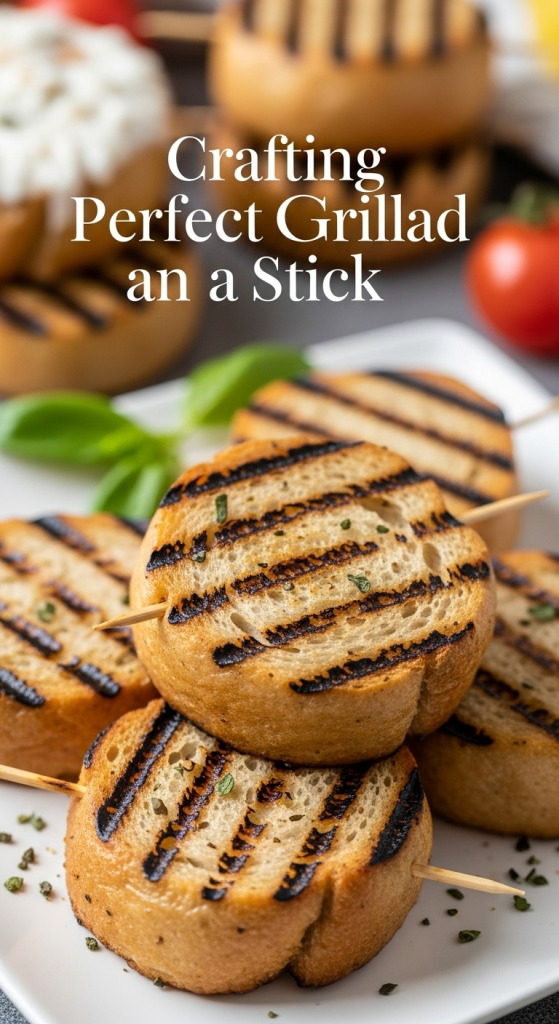


There’s something undeniably magical about food cooked over an open flame-the smoky aroma, the crackling sound, and that irresistible charred crispness. Among campfire favorites, grilled bread on a stick stands out as a simple yet profoundly satisfying treat.
Whether it’s a rustic twist to your morning toast or a comforting snack under starry skies, mastering the art of crafting perfect grilled bread on a stick unlocks endless flavor possibilities. In this article, we’ll explore techniques, tips, and creative variations to help you savor every golden, crispy bite-transforming humble bread into an unforgettable culinary experience.
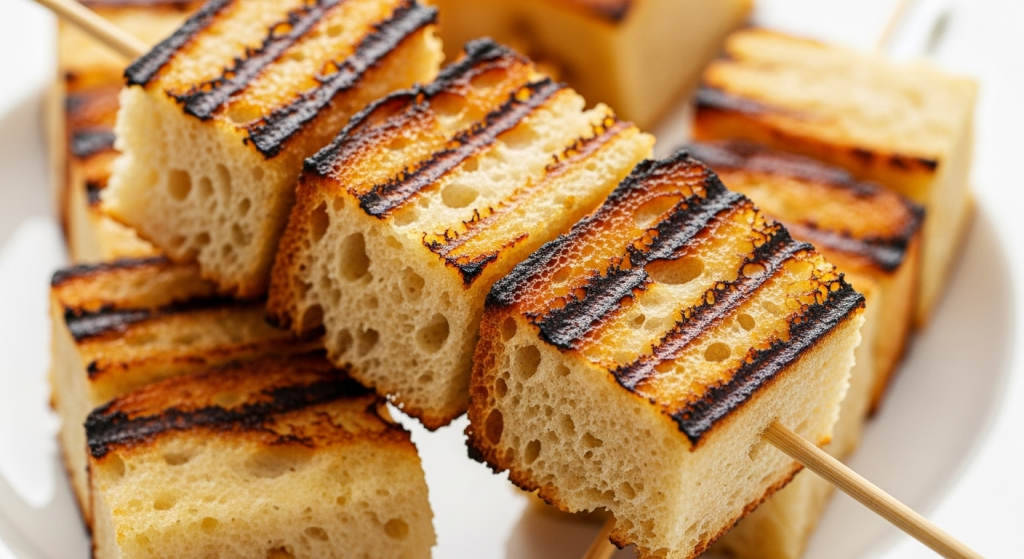
Savor the flavor: crafting perfect grilled bread on a stick begins with selecting the right dough-an essential step to achieving that coveted crispy exterior paired with a tender, flavorful interior. This simple yet elegant preparation traces its roots to rustic outdoor cooking traditions, where the crackling flames and fresh air infuse every bite with unforgettable aroma and warmth.
Prep and Cook Time
- Preparation: 15 minutes
- Resting (dough proofing): 1 hour
- Grilling time: 10-15 minutes
- Total Time: Approximately 1 hour 30 minutes
Yield
Serves 4 enthusiastic bread lovers
Difficulty Level
Easy to Medium – perfect for those eager to try open flame cooking without stress
Ingredients
- 2 cups all-purpose flour, sifted
- 1 tsp active dry yeast
- 1 tsp sugar
- 3/4 cup warm water (110°F / 43°C)
- 1 tsp sea salt
- 2 tbsp extra virgin olive oil, plus extra for brushing
- Fresh herbs: 1 tbsp chopped rosemary, thyme, or oregano
- Spices (optional): 1/2 tsp smoked paprika or ground cumin
Instructions
- Activate the yeast: In a small bowl, combine warm water, sugar, and yeast. Stir gently and let it sit for 5-7 minutes until frothy. This signals active yeast ready to leaven your dough.
- Prepare the dough: In a large mixing bowl,whisk together the all-purpose flour and sea salt. Add the olive oil and herb selection, mixing just enough to distribute evenly.
- Combine liquids and dry ingredients: Pour the yeast mixture into the flour bowl. Using a wooden spoon or your hands, fold the mixture until it begins to come together.
- Knead: transfer the dough to a lightly floured surface and knead for 8-10 minutes. The result should be a smooth, elastic dough-slightly tacky but not sticky. Add flour sparingly during this process.
- First rise: lightly oil a clean bowl, place the dough inside, and cover with a damp cloth or plastic wrap. Let it rise in a warm place for about 1 hour, or until doubled in size.
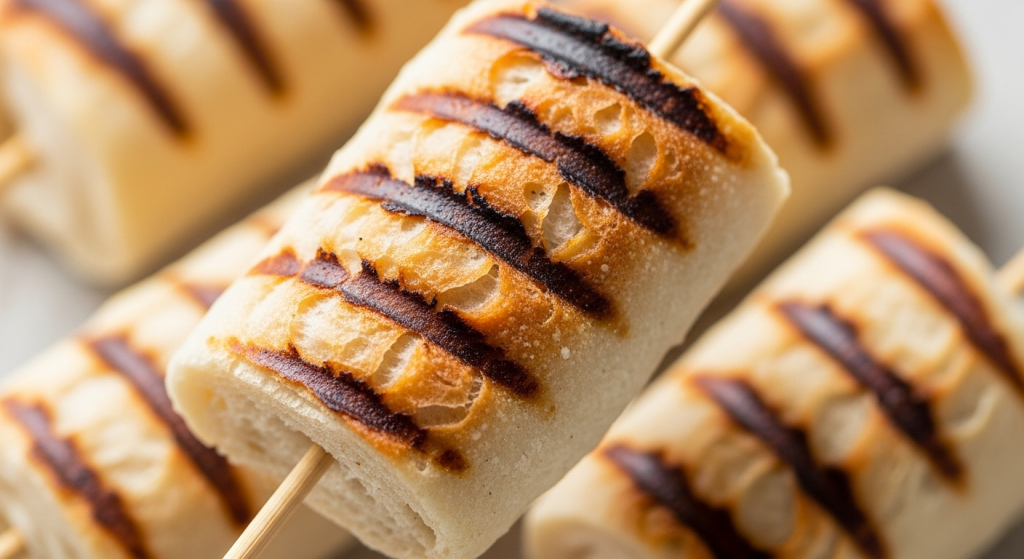
- Shape the bread sticks: Punch down the dough and divide into 4 equal portions. Roll each portion into a long rope approximately 12 inches. Carefully twist or spiral the dough around your clean, food-safe sticks, leaving the base free for holding.
- Prepare the grill: Light your charcoal or gas grill to medium heat. Ensure the coals are glowing with no large flames for consistent heat.
- Grill to golden perfection: Place the sticks with dough over indirect heat first, turning every 1-2 minutes. Brush with olive oil after the first 5 minutes. Once the dough is firm and slightly risen, move the sticks closer to direct heat to develop a crispy, golden crust. Expect about 10-15 minutes total.
- Test doneness: Look for an evenly toasted exterior with blistered spots and a soft, airy crumb inside. Slightly tap the bottom of the dough rope; it should sound hollow.
- Remove and serve: Let your grilled bread cool for 5 minutes before pulling it off the stick. Brush again lightly with herb-infused olive oil or garlic butter to enhance flavor.
Tips for Success
- Choosing the ideal dough: Bread doughs high in hydration and low in sugar create a lighter crust ideal for grilling. Avoid enriched doughs laden with milk or butter as they brown too quickly and can burn.
- Temperature control: Mastering even heat distribution on an open flame is key. Start over indirect heat then finish on direct to avoid undercooked or charred bread.
- Herbs and spices: Incorporate dried herbs into the dough for a subtle infusion or brush fresh herb oils on post-grill for vibrant finishing notes.
- Make-ahead: Dough can be refrigerated overnight after the first rise, wrapped tightly to develop deeper flavor. Let it warm slightly before shaping and grilling.
- Troubleshooting: If the bread sticks to your hand-stick, lightly oil the stick before wrapping dough. Use wooden sticks soaked for 30 minutes in water to prevent burning.
Creative Serving Ideas
These flavorful grilled bread sticks shine as a centerpiece or side dish. Serve alongside a vibrant roasted tomato bruschetta for a fresh contrast. Top with crumbled goat cheese, a drizzle of honey, and toasted pine nuts for an elegant appetizer. For a savory finish, layer with smashed avocado, chili flakes, and a squeeze of fresh lemon.
For extra indulgence, serve paired with a bowl of warm, herby olive oil or your favorite pesto. Garnish with fresh microgreens or edible flowers to elevate the visual appeal and flavor profile.
| Nutrient | Per Serving |
|---|---|
| Calories | 220 kcal |
| Protein | 6 g |
| Carbohydrates | 38 g |
| Fat | 5 g |
For more inspiration on grilling techniques and bread recipes, check out King Arthur Baking’s guide to grilling bread. This trusted resource offers valuable insights to complement your grilling adventures.
Q&A
Savor the flavor: Crafting Perfect Grilled Bread on a Stick – Q&A
Q1: What makes grilled bread on a stick different from conventional grilled bread?
A1: Grilled bread on a stick transforms a simple loaf into a fun, portable, and interactive treat. Unlike flat slices on a grill,the bread spirals around a stick,allowing even charring and easy rotating. This method gives you a crispy, smoky exterior with a soft, warm interior-perfect for snacking by a campfire or adding a gourmet touch to any outdoor gathering.
Q2: What type of bread works best for grilling on a stick?
A2: Sturdy breads with a bit of chew, like sourdough, rustic Italian, or a hearty country loaf, are fantastic for this technique. Their dense crumb holds up well over the heat without falling apart. Avoid overly soft or crumbly breads, which might not maintain their shape when wrapped around the stick.
Q3: How do you prepare the bread for skewering?
A3: start by slicing the bread into long, even strips-about 1 to 1.5 inches wide works well. Then, spiral each strip tightly around a clean, seasoned stick. The tighter the spiral, the more evenly it cooks. Leaving small gaps can help heat circulate and create those irresistible crispy edges.
Q4: What’s the best way to grill bread on a stick?
A4: Hold the stick over medium-hot coals or a grill grate, rotating slowly and steadily. This gradual turning ensures a golden-brown crust without burning. Watch closely-the bread can go from perfectly charred to overly blackened quickly, so patience is key!
Q5: Should the bread be seasoned before grilling?
A5: Absolutely! Brushing the bread with olive oil and sprinkling with sea salt and herbs-such as rosemary, thyme, or garlic powder-adds layers of flavor. You can also experiment with chili flakes for a subtle kick or a drizzle of honey after grilling for a sweet-savory finish.
Q6: Can I add flavors to the bread after grilling?
A6: Yes! Once grilled to perfection, brush on compound butters infused with garlic or herbs, or sprinkle grated cheese that melts slightly on the warm bread. For a fresh twist, consider topping with chopped tomatoes and basil or a smear of creamy avocado.
Q7: What safety tips should I keep in mind when grilling bread on a stick?
A7: Use sticks that are sturdy and free from any toxic resins-fruit tree branches like apple or cherry are excellent choices.Make sure the sticks are soaked in water for 20-30 minutes beforehand to prevent burning. Always handle the sticks carefully to avoid burns and never leave the grill unattended.
Q8: How can I make grilling bread on a stick a fun group activity?
A8: Set up a DIY grilling station with various breads, seasoning options, and toppings. Friends and family can craft their own bread spirals and customize flavors, roasting together around the fire. It’s a hands-on way to spark creativity and savor appetizing moments outdoors.
Q9: Are there variations to grilled bread on a stick worth trying?
A9: definately! Try wrapping thin slices of vegetables like zucchini or bell peppers alongside the bread for a smoky veggie twist. Or incorporate finely chopped herbs or sun-dried tomatoes into the bread dough before cooking. The possibilities are endless when creativity meets the fire.
Q10: What makes grilled bread on a stick a timeless culinary delight?
A10: It merges the ancient art of open-fire cooking with the universal love of fresh bread, creating a sensory experience that’s both rustic and refined.The crackling sound,the inviting aroma,and the delightful crunch combine to make every bite memorable-a true festivity of flavor and tradition.

Final Thoughts
As the final ember fades and the scent of smoky bread lingers in the air, you’ve unlocked the simple joy of crafting grilled bread on a stick-a timeless ritual that transforms humble dough into a flavorful feast. whether you’re gathered around a campfire or stoking your backyard grill, the magic lies in the dance of heat and dough, the crisp golden crust giving way to a warm, tender crumb inside.
So next time you reach for that stick and dough, remember: each twist, each turn, and every moment by the flames is an invitation to savor not just the bread, but the experience itself. Happy grilling, and may your fires always glow with delicious possibility.